3. CREATING AN ANIMAL RECORD
TUTORIAL STEP: Tap the “ANIMALS” icon.
Note: the “ADULTS, JUVENILES, and INFANTS” icons are all "ANIMALS" but filtered into their respective categories.
TUTORIAL STEP: Tap the “ADD NEW” button.

Registration No: If the animal is registered with a council this detail can be recorded here.
Breed: The animal’s particular species or breed.
Coat Type: The outer skin or coat texture.
Coat Colour: The outer skin or coat color.
Distinguishing Features: Any unique markings on the animal or shape of the animal etc.
Age group: Assign an age group to the animal. This will allow you to separate your breeding animals from your growing infants.
We are now in the Animal profile section. An Animal Id is generated automatically. This is used to uniquely identify the animal in the records in case animals with the same name are created.
Animal Name: A unique name chosen to identify the animal easily which can be modified any time.
Breeding Color Id: A color usually chosen for newly born animals to identify them before they receive names. Records are often taken, like weights of animals, before they are large enough to identify easily.
Profile Picture: A selected picture that identifies the animal. A thumbnail is generated from this image. Only JPEGS and PNGS are supported at this time.
Microchip Number: This field can be used to uniquely identify the animal for lineage purposes even if the animal is not microchipped or if the microchip number is unknown. The microchip numbers in Breeding Buddy link animals together for identifying ancestors and descendants.
Microchip Date: The date an animal was assigned a microchip.
Supply Number: Supply numbers are required by law to be recorded against animals in certain states. Please check relevant legislation to see if this applies to you.
Eye Colour: The animal’s identifying eye features if any.
Sex: Male or Female.
Sale Price: This field will be used to auto populate the invoice created when the animal is sold.
Sex: Male or Female
Notes: Any additional information can be recorded here including historical information. Because the animal record is a single record of an animal, and historical changes to this animal are not retained when the animal is updated, you may choose to use this field to make notes about the animal’s history. E.g. if you change the vet, but wish to keep the details of the previous vet attached to this animal, there is an "ADD HISTORY" button attached to this field (accessed by clicking the "MORE" icon) that will copy the previous details automatically into the Notes.

Files
Files can be stored with an animal’s profile. A profile storage location is created automatically under the animal’s unique Profile Id. Pictures, Videos and Documents can be stored here.
Note: When synchronization occurs all Pictures, Videos and Documents are uploaded into the animal's profile folder and removed from the device. This is to save storage space locally on the device.

Previous Owner: This animal's previous owner details can be useful and recorded here.
Owner: The care giver or person responsibly in charge of the animal’s welfare.
Vet: The veterinarian or health service specialist currently assigned to this animal.
Sold or Leased To: The person currently in possession of the animal when leased, fostered, studded or sold. This field is auto updated when a lease, foster, stud or sale is recorded and the animal is attached.
Expanding a contact will show the details of the contact attached. Contacts are stored in Breeding Buddy's database. They can be added via numerous mechanisms including tapping the “OWNER” icon and selecting “NEW CONTACT” for example.
Date of last mating: This will be automatically updated when an animal mating record is created.
Special Medical Requirements: Staff or vets should be made aware of these requirements before treating this animal.
Special Observations if any: If the animal is behaving unusually or there are special care requirements, these details should be recorded here so staff are aware.
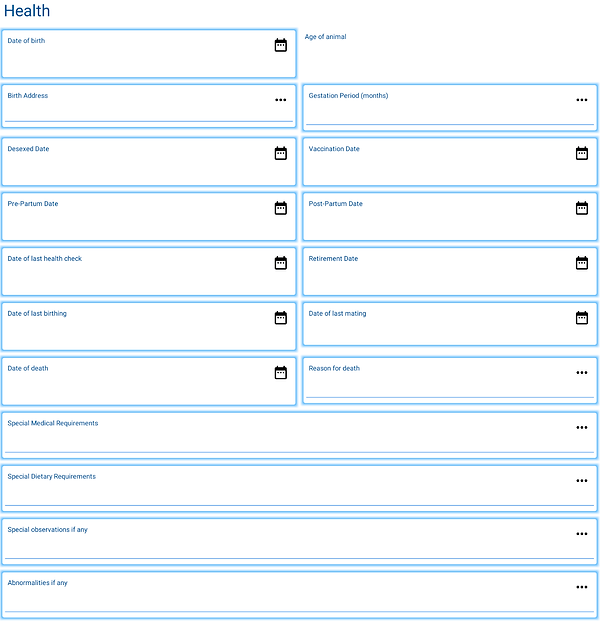
Date of death: If a date is assigned here then the animal is considered deceased and will be counted in the deceased animal statistics. It is recommended to create a profile even for still born animals and add this info so that records are complete and animals that produce a high volume of deceased or still born animals can be identified and removed from breeding.
Date of birth: The animal's date of birth.
Age of animal: The age of the animal is auto calculated and displayed when a profile is opened and the date of birth is set.
Birth Address: The physical location of the animal's birthing.
Gestation Period: If the animal is female this will be displayed as an option. The gestation period in months i.e. the usual period of time from mating date to actual birthing date. Can be in decimal format e.g. 2.5. The pregnancy records will use this data to estimate a birthing date.
De-sexed Date: Or sterilization date. The date the animal was sterilized or neutered.
Vaccination Date: Date of last vaccination of the animal.
Pre-Partum Date: Date of pre-partum health check (if applicable before giving birth).
Post-Partum Date: Date of post-partum health check (if applicable after giving birth).
Date of last health check: Date of animal's last health check-up or vet visit. Can be recorded here or separately in Health records.
Retirement Date: Date the animal will be retired from breeding. This is used to generate an auto reminder that the animal needs to be retired when this date passes.
Date of last birthing: If the animal is female this will be displayed as an option. This is automatically updated when a pregnancy record is saved.
Reason for death: A brief note explaining the circumstances of the death.
Special Dietary Requirements: Feeding staff should be made aware of these requirements before feeding this animal.
Abnormalities if any: Abnormalities recorded here will be added to statistics if this field is not blank. This can be useful in identifying high abnormality birth rates. Also this will help care givers identify additional special needs if recorded here.


Genetic Diseases
Can be picked from a list or custom values can be added. Recording this information is useful when selecting mating pairs in the mating records as these details will be shown when selecting the animals. Simply select or type a disease name and tap the “+” icon. This will add the disease to the list. Tapping the “CLEARED”, “UNKNOWN”, “CARRIER” or “AFFECTED” fields identifies if the animal has, or has not, been cleared of a DNA trait. You can either list a value for each individual disease or record a global value to view when mating. Here are a few example suggestions that could be used.

Microchip of Mother & Father: If this is defined, this will be matched against an animal profile so that lineage and profile navigation can function.
Date Parents Mated: This can be defined or, if this is a child profile, it will obtain this value when it is attached to a litter or a pregnancy automatically.
DELETE: Deletes the animal from the database and any folders associated with that animal. If the animal has historic records such as health records and other data these will be attempted to be removed also.
HOME: Returns to main menu.
SAVE: Writes the data to the database.
Date of Acquisition/Arrival: Date the animal arrived and was transferred into this facility.
Disposal Date: Date the animal was sold or given away etc.
Disposal Type: Category of disposal e.g. sold, death, charity.
Disposal Details: Description of how the animal was disposed of. This can include transport details or details of sanitary disposal mechanisms in case of death etc.
Enclosure Id: The Id number of where the animal is housed. This is auto populated once the animal is attached to an enclosure.
Enclosure Name: The name of the enclosure where this animal is located.
Open Father, Open Mother: Navigates to and opens the father or mother’s animal profile.
Name of Father & Mother: Select or type a name for the parents of this animal. The microchip number, if the profile exists, will auto populate in the field next to this. Be aware that, in the case of duplicate names, this may be incorrect and may need to be updated manually.
COPY: Copy can be used to copy an entire profile to a new record for faster data entry. E.g. if creating a litter we can fill out all the details for a single animal like its vet, date of birth etc. then save it. Then we can copy that profile to a new record, change the name, and possibly the sex of the animal, and save it as a new animal. This saves a significant amount of time when entering large amounts of data.
ADDITIONAL NAVIGATION TIP: Every field in an animal profile can be copied to another profile or group of animal profiles. E.g. we can copy a field to an entire litter to save time on data entry. Tap any data entry field’s icon and select “COPY TO PROFILE”. The following prompt is displayed. Type or select an animal or group and tap “YES”. This will update the associated profiles with the data type listed above. In the example below it shows how the Date of Acquisition/Arrival is copied.

TUTORIAL STEP: Type “Romeo - Male” in the "ANIMALS NAME" field > tap “SAVE”.
TUTORIAL STEP: Copy the animal by tapping the “COPY" button.
TUTORIAL STEP: Tap "MORE" in the "ANIMALS NAME" field > tap "CLEAR ENTRY" > type “Juliet - Female” in the "ANIMALS NAME" field.
TUTORIAL STEP: Tap “SEX” > tap “PICK FROM LIST” > tap “FEMALE” > tap “SAVE” > tap “BACK”.

We now have two animal records. The number of records is displayed in the top right.
We can tap any record listed and it will open the record to be edited with the animal’s previous data.
TUTORIAL STEP: Tap “Romeo - Male” > add a microchip number e.g. 111 > tap “SAVE” > tap “BACK”.
TUTORIAL STEP: Tap “Juliet - Female” > add a microchip number e.g. 112 > tap “SAVE” > tap “BACK”.

You will notice the data has auto updated in the preview fields.
TUTORIAL STEP: Tap the “FILTER” icon.

"FILTER" icon
You will notice you can set the “Search Field” that you want to filter on.
And how the results will be displayed by allowing you to choose the field to "Sort By" and either "Ascending" or "Descending" sort order.
All these settings are saved when you alter them. This is so you can have your preferred list returned in any order you choose, each time you return to a page.